使用 OpenWrt 策略路由把流量转发到旁路网关
前言🔗
最近一段时间,小山重新规划了家里的网络,更换了主路由,并把之前主路由上运行的一些软件卸载到了旁路由。
我目前的旁路由是基于 ArchLinux 构建的,如果你对此感兴趣可以查看《基于 ArchLinux 构建旁路由》。下面的教程依然是以基于 OpenWrt 的旁路由为准。
常见的使用旁路由的方法有两种,第一种是把设备的网关更改旁路由的 IP,第二种是用 DHCP 为设备下发网关,两种方法都是让设备的所有流量转发到旁路由处理。无论用哪种方法设置设备的网关,都会导致两个问题,其一,如果旁路由掉线,设备将无法访问互联网,其二,IPv4 的端口转发会失效,虽然有变通的解决方法,但是都称不上完美。
如果要解决上面提到的问题,需要用第三种方法:策略路由。什么是策略路由?通过配置规则将流量路由到不同的目标/网关,它可以在设备端实现,也可以在路由端实现,这种方法的好处在于,即使旁路由掉线,也不会影响正常上网。经过这段时间的摸索,我整理出了一套在 OpenWrt 上实现策略路由的方案,将特定的流量从主路由转发到旁路由。
开始之前,请确保你的旁路由可以正常工作并且运行模式是 Redir-Host,主路由正在运行的 OpenWrt 版本不低于 24.10.0,我没有在低版本测试过,还需要熟悉 SSH 和终端的使用,之后的大部分操作都需要运行命令。
如果你之前使用的方法是手动设置网关或 DHCP 下发网关,请先还原这些设置。
除非另有说明,否则所有操作都是在主路由上进行。
启用旁路由的 IP 动态伪装🔗
为了避免主路由的防火墙规则陷入循环和一些其他问题,首先需要在旁路由启用 IP 动态伪装。
打开旁路由的 OpenWrt 管理界面,转到「网络」->「防火墙」,然后选中区域「lan」的「IP 动态伪装」选项框,最后保存并应用。
创建路由和规则🔗
首先添加一个路由表和路由规则,将特定流量转发到特定网关。
给序号 288 的路由表创建别名 bypass:echo '288 bypass' >> /etc/iproute2/rt_tables
添加一个路由到 bypass 路由表,并将网关设置为旁路由,务必将 %gateway% 更改为你的旁路由 IP 地址:
uci set network.bypass_route=route
uci set network.bypass_route.interface='lan'
uci set network.bypass_route.target='0.0.0.0/0'
uci set network.bypass_route.gateway='%gateway%'
uci set network.bypass_route.table='bypass'
uci commit
创建路由规则,将包含特定标记的流量转发到 bypass 路由表:
uci set network.bypass_rule=rule
uci set network.bypass_rule.in='lan'
uci set network.bypass_rule.lookup='bypass'
uci set network.bypass_rule.mark='114514'
uci set network.bypass_rule.priority='30000'
uci commit
执行命令 /etc/init.d/network reload 重新加载路由,然后转到 OpenWrt 管理界面查看路由是否已加载。

刚刚创建的路由规则只转发包含特定标记的流量,所以要让 nftables 给特定的流量写入标记。不过在此之前,我们先为 nftables 创建一些地址集合。
创建 nftables 地址集合🔗
下载并创建国内 IPv4 地址段集合:
wget -O /etc/luci-uploads/chnroutes.txt https://ispip.clang.cn/all_cn.txt
uci set firewall.cn_ipv4_ipset=ipset
uci set firewall.cn_ipv4_ipset.name='cn_ipv4_ipset'
uci set firewall.cn_ipv4_ipset.family='ipv4'
uci set firewall.cn_ipv4_ipset.loadfile='/etc/luci-uploads/chnroutes.txt'
uci add_list firewall.cn_ipv4_ipset.match='dest_net'
uci commit
我们还需要创建一个 MAC 地址集合,用于检查流量来源,从而实现只处理特定设备的流量。
创建 MAC 地址集合:
uci set firewall.bypass_devices=ipset
uci set firewall.bypass_devices.name='bypass_devices'
uci set firewall.bypass_devices.family='ipv4'
uci add_list firewall.bypass_cn_ipset.match='mac'
uci commit
MAC 地址集合默认是空的,可以手动在 OpenWrt 管理界面添加地址,如下图所示:

比如需要让电脑和手机的流量转发到旁路由,添加这两个设备的 MAC 地址即可。需要注意的是,如果 WiFi 启用了隐私 MAC 地址,则需要添加对应的隐私 MAC 地址。
下一步也是最关键的一步,创建 nftables 处理规则,给特定的流量写入标记,让路由规则可以工作。
创建 nftables 处理规则🔗
创建并编辑规则文件 /etc/nftables.d/99-bypass.nft,文件内容如下:
set bypass_lan_ipv4_ipset {
type ipv4_addr
flags interval
auto-merge
elements = {
0.0.0.0/8,
10.0.0.0/8,
100.64.0.0/10,
127.0.0.0/8,
169.254.0.0/16,
172.16.0.0/12,
192.0.0.0/24,
192.0.2.0/24,
192.88.99.0/24,
192.168.0.0/16,
198.18.0.0/15,
198.51.100.0/24,
203.0.113.0/24,
224.0.0.0/4,
233.252.0.0/24,
240.0.0.0/4,
255.255.255.255/32
}
}
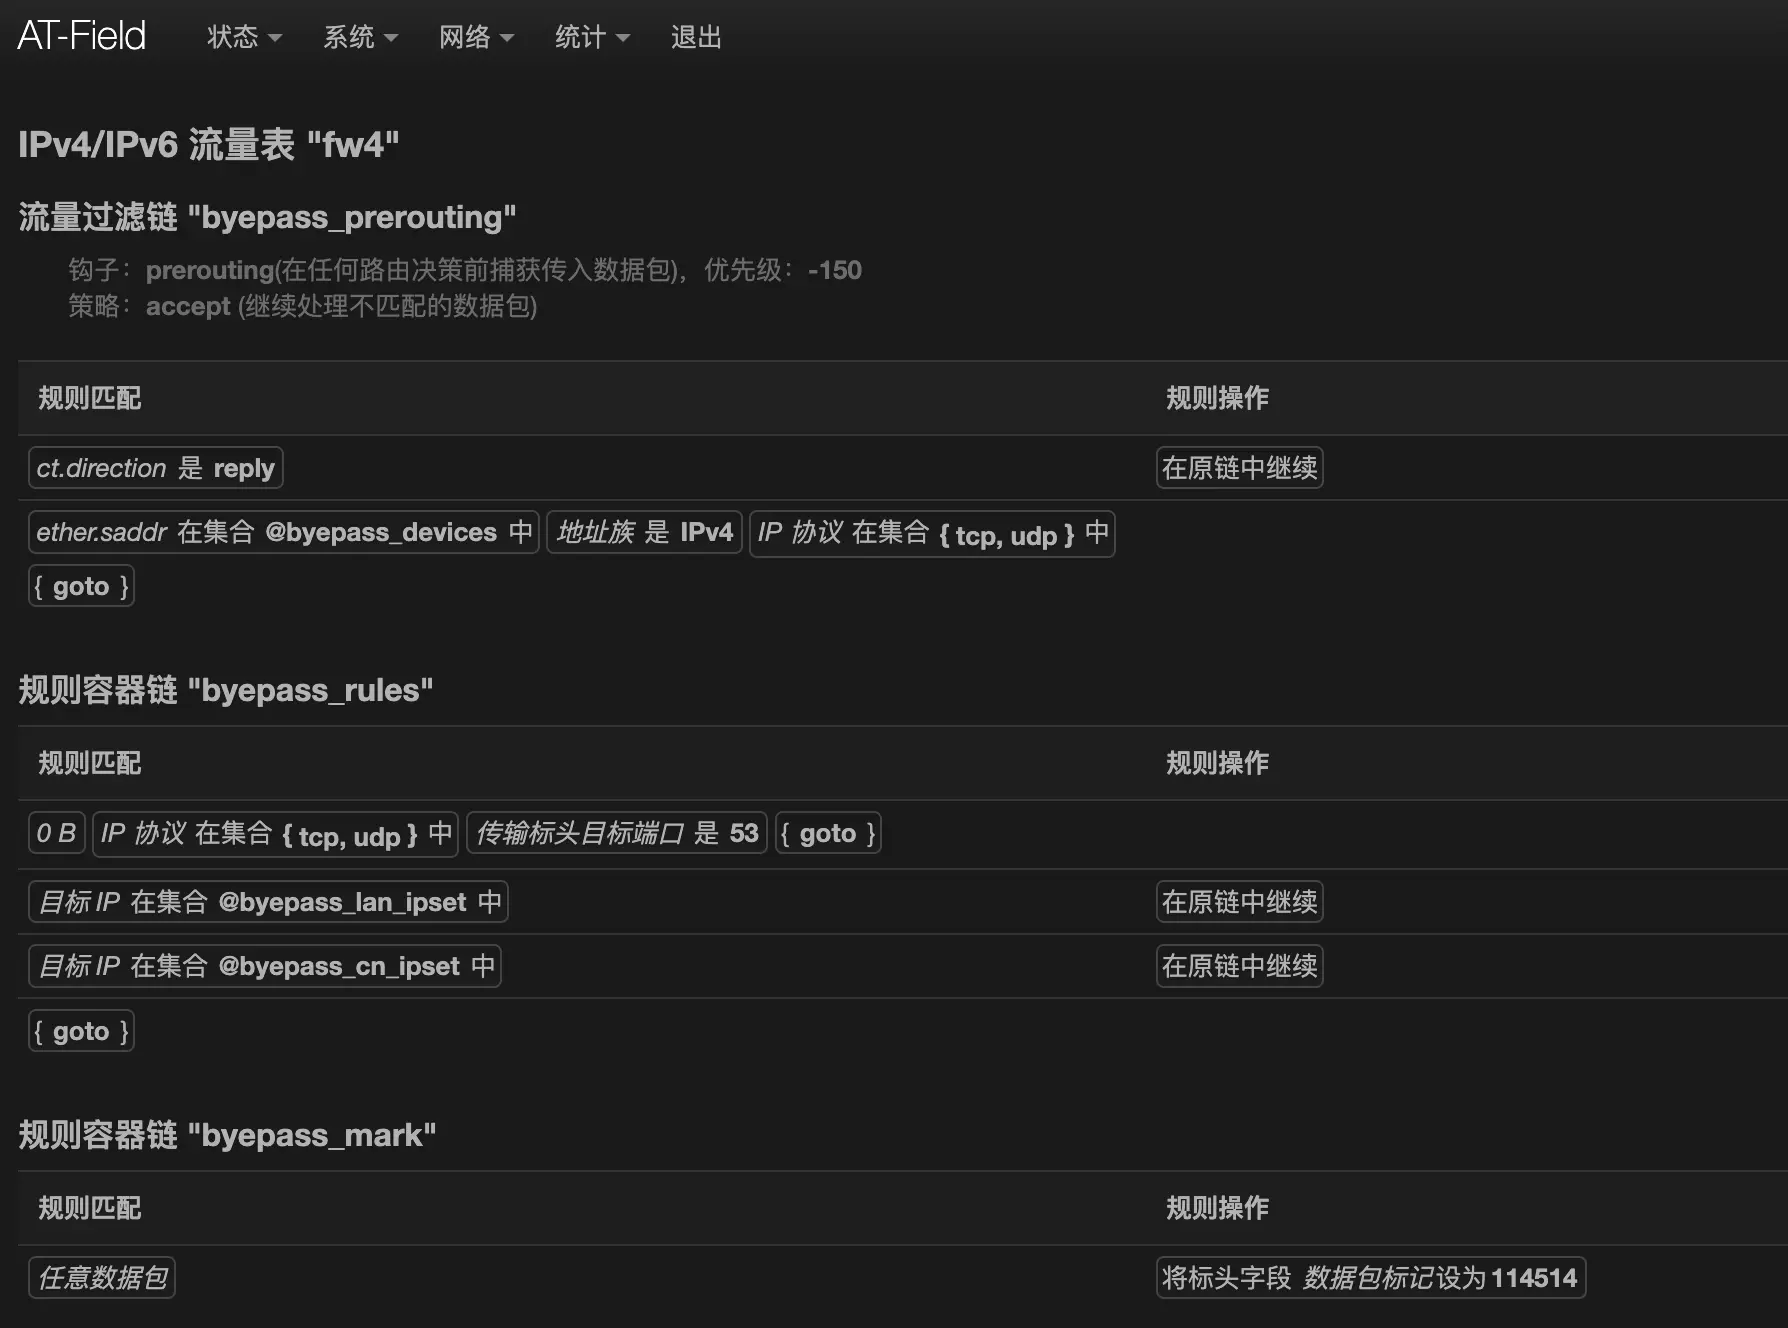
chain bypass_prerouting {
type filter hook prerouting priority mangle; policy accept
ct direction reply return
ether saddr @bypass_devices meta nfproto ipv4 meta l4proto { tcp, udp } goto bypass_rules
}
chain bypass_rules {
meta l4proto { tcp, udp } th dport { 53 } goto bypass_mark
ip daddr @bypass_lan_ipv4_ipset return
ip daddr @cn_ipv4_ipset return
goto bypass_mark
}
chain bypass_mark {
meta mark set 114514 counter
}现在执行命令 /etc/init.d/firewall reload 重新加载防火墙规则,然后转到 OpenWrt 管理界面查看防火墙规则是否已加载。
如果确认无误,现在可以访问 https://www.ipip.net 和 https://ip.sb 确认策略路由是否工作正常。如果不工作,可以试着重来一遍,以及确保设备的 MAC 地址已经添加到集合。
还有一种特殊情况也会导致策略路由无法正常工作,旁路由如果通过一个中继路由连接到主路由,中继路由有一些特殊设置,会导致流量无法转发,要解决这个问题,可以再在主路由上为特定流量启用 IP 动态伪装。
添加防火墙规则为特定流量启用 IP 动态伪装:
uci set firewall.bypass_masq=nat
uci set firewall.bypass_masq.name='Bypass-MASQUERADE'
uci set firewall.bypass_masq.family='ipv4'
uci set firewall.bypass_masq.src='lan'
uci set firewall.bypass_masq.target='MASQUERADE'
uci set firewall.bypass_masq.mark='114514'
uci add_list firewall.bypass_masq.proto='all'
uci commit
/etc/init.d/firewall reload创建网关状态检查脚本🔗
你可能注意到了,上面的 nftables 规则跳过了目标 IP 是国内 IP 的流量,但是没有跳过目标端口是 53 的流量,原因是因为要做到无感故障转移,即使旁路由掉线了,设备的网络也不会故障,不过 DNS 的故障转移要用一种特殊的方法,下一步再细说。
首先创建一个网关状态检查脚本,这个脚本会不停的检查网关可用性,如果发现网关不可用,会临时禁用路由规则,当网关可用时重新启用规则。
创建并编辑文件 /etc/init.d/check-bypass-gateway,文件内容如下:
#!/bin/sh /etc/rc.common

START=99
STOP=01
USE_PROCD=1

_SCRIPT="/tmp/$(basename "${initscript:-check-bypass-gateway}")-helper.uc"

start_service() {
    if [ -e "$_SCRIPT" ]; then
        rm "$_SCRIPT"
    fi
    cat > "$_SCRIPT" <<'EOF'
#!/usr/bin/env ucode
import * as uci from 'uci';
import * as uloop from 'uloop';

const gateway = uci.cursor().get('network','bypass_route', 'gateway');
let connectable = 1;

if (!uloop.init()) {
    die(`Initialization failure: ${uloop.error()}\n`);
}

function gateway_online() {
    for (let i = 0; i < 3; i++) {
        if (system(`ping -c 1 -W 1 '${gateway}' >/dev/null 2>&1`) == 0) return true
    }
    return false;
}

function network_reload() {
    system('service network reload');
}

function main() {
    if (gateway_online()) {
        if (connectable == 0) {
            sleep(3000);
            const ctx = uci.cursor();
            ctx.delete('network', 'bypass_rule', 'disabled');
            ctx.commit();
            network_reload();
            connectable = 1;
            printf(`The gateway is back online! (${gateway})\n`);
        }
        uloop.timer(3000, main);
    } else {
        if (connectable == 1) {
            const ctx = uci.cursor();
            ctx.set('network', 'bypass_rule', 'disabled', true);
            ctx.commit();
            network_reload();
            connectable = 0;
            printf(`The gateway is unreachable! (${gateway})\n`);
        }
        uloop.timer(5000, main);
    }
}

main();
uloop.run();
gc('start', 43200);
EOF
    chmod 0700 "$_SCRIPT"

    procd_open_instance
    procd_set_param command "$_SCRIPT"
    procd_set_param term_timeout 60
    procd_set_param stdout 1
    procd_set_param respawn 0 1 1
    procd_close_instance
}添加执行权限:chmod +x /etc/init.d/check-bypass-gateway
启动脚本:/etc/init.d/check-bypass-gateway enable && /etc/init.d/check-bypass-gateway start
现在你可以重启旁路由并检查路由规则是否被禁用。
需要注意的是,这个脚本默认并不会在系统升级时保留,除此之外,其他的设置和文件默认都会在系统升级时保留。
修改 DHCP 给设备下发 DNS🔗
以下指南假设主路由的 DNS 是污染的,如果你的主路由已经配置了无污染的 DNS,那么可以略过。
刚才提到了要用特殊的方法做到 DNS 的故障转移,原因是,如果给设备下发主路由的 DNS,那么解析结果是污染的,如果给设备下发旁路由的 DNS,如果旁路由掉线,设备会无法使用 DNS 解析。
针对这个问题,我的解决方法是,通过 DHCP 给设备下发一个可用的公共 DNS,由于目标端口是 53 的所有流量会被转发到旁路由,就可以在旁路由上将其拦截到本地。如果旁路由正常工作,发送到这个公共 DNS 的查询会被拦截,如果旁路由掉线,则不会经过任何处理。
如果你使用的是 ImmortalWrt 固件,请先关闭「DNS 重定向」功能,此选项位于「服务」->「DHCP/DNS」->「常规」。
首先修改主路由的 DHCP 选项,给标签为 bypass_onlydns 的客户端下发指定的 DNS,这里用的是百度的公共 DNS:
uci add_list dhcp.lan.dhcp_option='tag:bypass_onlydns,6,180.76.76.76'
uci commit
/etc/init.d/dnsmasq restart
创建并编辑文件 /etc/nftables.d/99-bypass.sh,这个脚本的作用是给集合里的 MAC 自动设置标签,文件内容如下:
#!/bin/sh

cat <<'EOF' | ucode -
import * as digest from 'digest';
import * as fs from 'fs';
import * as uci from 'uci';

const ctx = uci.cursor();
const g_macs = ctx.get('firewall', 'bypass_devices', 'entry');
const g_tag = 'bypass_onlydns';
let g_markd_macs = [];
let g_restart_dnsmasq = false;

ctx.foreach('dhcp', 'host', (section) => {
    if (!exists(section, 'mac')) return;
    const tags = type(section['tag']) == 'array' ? section['tag'] : [section['tag']];
    let markd = false;
    for (let tag in tags) {
        if (tag == g_tag) {
            markd = true;
            break;
        }
    }
    if (markd) {
        const mac = type(section['mac']) == 'array' ? section['mac'] : [section['mac']];
        push(g_markd_macs, ...map(mac, (v) => lc(v)));
    }
});

ctx.foreach('dhcp', 'dnsmasq', (section) => {
    const cfg = section['.name'];
    const main_conf = `/tmp/etc/dnsmasq.conf.${cfg}`;
    const conf = `/tmp/dnsmasq.${cfg}.d/bypass.conf`;
    for (let i = 0; i < 10; i++) {
        if (fs.access(fs.dirname(conf))) break;
        sleep(2000);
    }
    const conf_old_sum = digest.md5_file(conf);
    let data = "";
    for (let mac in g_macs) {
        mac = lc(mac);
        if (mac in g_markd_macs) continue;
        data += `dhcp-host=${mac},set:${g_tag}\n`;
    }
    const conf_new_sum = digest.md5(data);
    if (conf_old_sum != conf_new_sum) {
        fs.writefile(conf, data);
        g_restart_dnsmasq = true;
    }
});

if (g_restart_dnsmasq) {
    system('service dnsmasq restart');
}
EOF

exit 0
如果你已经为特定设备分配了静态 DHCP 租约,则需要手动为设备添加标签 bypass_onlydns。
将这个脚本加入到防火墙,当防火墙启动/重新加载时,脚本会自动运行:
uci set firewall.bypass_script=include
uci set firewall.bypass_script.type='script'
uci set firewall.bypass_script.path='/etc/nftables.d/99-bypass.sh'
uci commit
/etc/init.d/firewall reload
现在重新让设备获取 DHCP 并检查 DNS 是否是 180.76.76.76。
然后在旁路由上将 180.76.76.76 的 53 端口拦截到本地,在旁路由执行下面的命令:
uci set firewall.intercept_dns.target='DNAT'
uci set firewall.intercept_dns.name='Intercept-BaiduDNS'
uci set firewall.intercept_dns.src='lan'
uci set firewall.intercept_dns.src_dport='53'
uci set firewall.intercept_dns.src_dip='180.76.76.76'
uci commit
/etc/init.d/firewall reload
现在可以在设备上使用 nslookup 命令查询 DNS 结果并检查是否和旁路由返回的 DNS 结果一致。
至此,所有工作都完成了,尽情享受吧!策略路由不仅可以搭配旁路由使用,还可以做到单线 IPTV 复用等,总之是个很有用的特性。如果遇到问题,可以加入 QQ 群或在下方评论区与我探讨。
评论由 giscus 驱动,基于 GitHub Discussions。